Hoe kunnen we helpen?
Quick guide of Revisely
The options ‘Assignment will be graded’ and ‘Include CEFR grading’ speak for themselves.
The option ‘Use evaluation criteria‘ and ‘Show evaluation criteria to students‘ determines whether evaluation criteria are used for this assignment and whether students will be able to see which criteria are used to assess the assignment. These criteria or categories are explained below.
Under the heading ‘scores/grades/criteria‘ you will find the different criteria on which you are going to assess an assignment. Revisely has 7 standard criteria and you can add up to 5 own assessment criteria yourself. The standard criteria correspond to the categories in which the observations are classified in the database. More information about the database of observations can be found under the ‘observation database’. Here you can also choose the weighting of the chosen criteria. Just make sure the total adds up to 100%.
Finally you can add relevant documents and websites. This can be an article that students have to write their assignment about or a video or audio fragment in which arguments can be found. Any form of digital documentation is possible here.
As soon as you click on ‘save‘ and you have selected the option at ‘status’ (at the top of the page) that students will automatically receive a message as soon as the assignment has been published, the students will immediately receive a notification. If not, remember that the assignment is saved but that students are not able to start their assignments yet. If you would like to publish the assignment on a later time, go to the assignment (via ‘Assignments’ in the menu on the left) and click on the button with the three dots. Then click on ‘Modify assignment’ and change at ‘status’ the assignment to ‘published’.
The students have now received a message about the new assignment. This message will be sent by e-mail. In this e-mail message they find a link and by clicking on the link they are immediately directed to the assignment.
After publication, it is still possible to make changes to the assignment to a limited extent. It is also possible to make a copy of an assignment and give it to another class. This is possible by Modifying the assignment as is explained above.
Sent notification
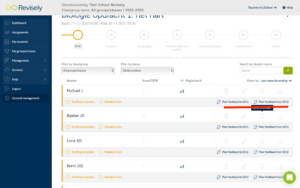
Sometimes you want to inform students at a different time that they have a new assignment. Or you want to send a reminder. In that case, you can go to the list of assignments by selecting ‘Assignments‘ in the menu (left). Then click on the 3 dots on the right of the screen. This is shown in the picture with a red circle. Now choose ‘Remind all‘ to send everyone a notification of the new assignment. As soon as you click on it, the reminders will be sent immediately.
You can also choose to send a reminder to one or a coupleof students. Click on the assignment to see which students have already submitted the text and which should be remembered.
Giving of feedback – correcting texts
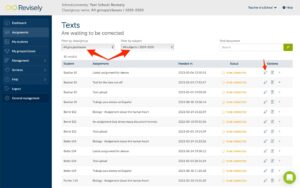
On the dashboard (see image below) you see that there are 14 texts that you still need to provide feedback on. Clicking on the orange button will take you to the page with the list of pending assignments.

The assignments are initially in alphabetical order of the student’s name. You can also sort by title of the assignments or by date/time of submission. Click on the marker icon to start correcting an assignment.
Once you’ve clicked on that marker icon, you’ll see the page with the document that you can start to correct.
You can also go to ‘Assignments‘ in the menu on the left to see the assignments that have to be corrected. Here you can see per assignment how many texts have been handed in and the ones that are corrected and that still have to be corrected. You can also see more details of this assignment by clicking on the different data. Also on this page it is possible to search assignments through the filters. Click on ‘..to be corrected’ of the assignment you wish to grade.
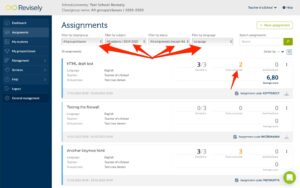
The advantage is that you can now easily select the students to whom you want to send a reminder or for whom you want to hand-in a text. As shown below in the image. By clicking on the icon with the marker you can start correcting the document that was handed-in by the student.
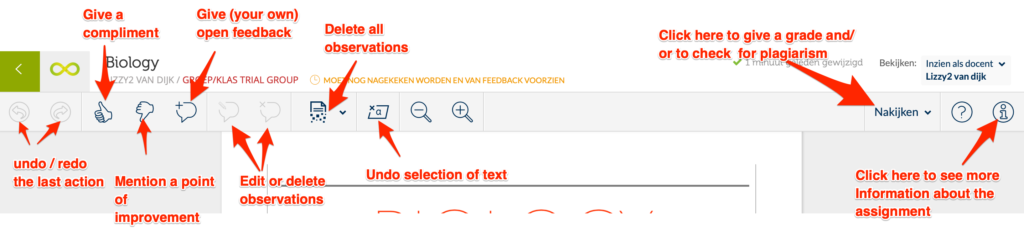
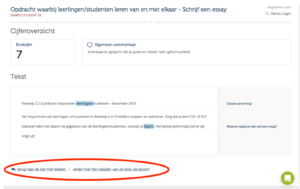
When you come to the review page, you see the text as it was submitted by the student. At the top of the page is a menu bar with various buttons that can be used to provide the text with feedback. See the image below for an overview.
NOTE: if the deadline has not yet expired, the student can submit a new version of the text. If a student does hand in a new assignment, the system sees this as a new text, therefore, be reviewed again and be provided with feedback.
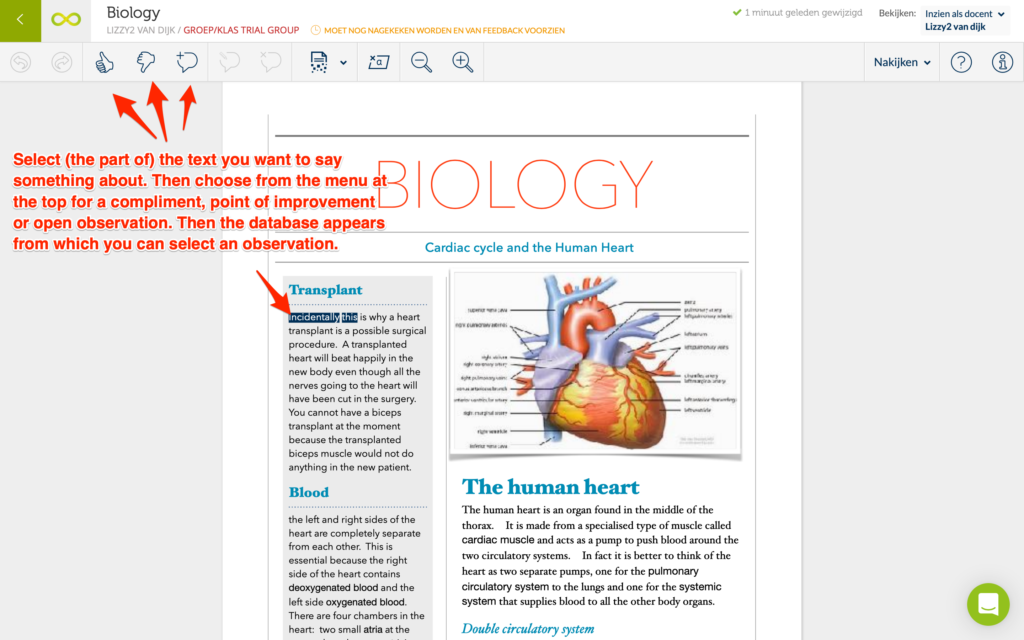
Once you have selected a part or more parts of the text, the buttons in the menu at the top bar will become active. The different buttons are explained in the picture below.
The observation-database
Once one or more words or parts of the text are selected, it is possible to place an observation with the text. This feedback can be given in the form of compliments, critical comments or open comments.
The compliments and critical feedback form a set of 400-500 observations that are specific to the language of the text to be corrected. In the database, these observations are divided into sections or categories that you also saw when creating a new assignment. Within the section/category, you can give both positive feedback (compliments) And critical feedback (points for improvement).
All observations are shown in the margin, combining equal observations. See the image below with a number of types of observations. The compliments are indicated with the color green, the critical points with the color brown and the open observations with the color blue.
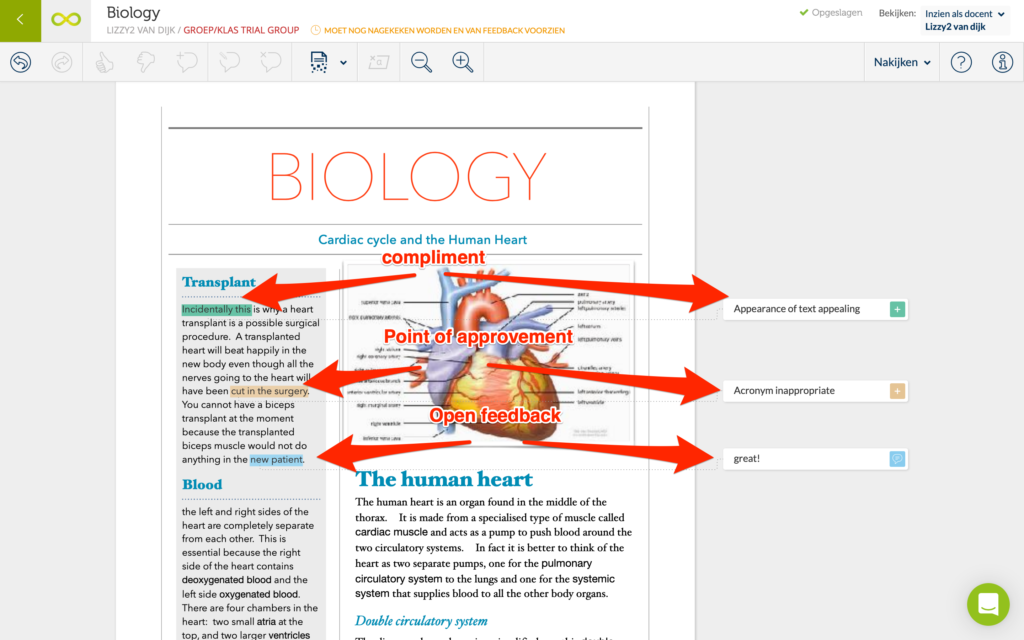
The observations on the side of the text are clearly structured and provide insight and an overview of all remarks for the teacher and for the student. It is immediately clear what strengths and points of improvement there are, where they occur and how they can be solved. There is additional theory and/or improvement points attached to the observations in the database for the student. This way the feedback becomes more transparent and also becomes more significant.
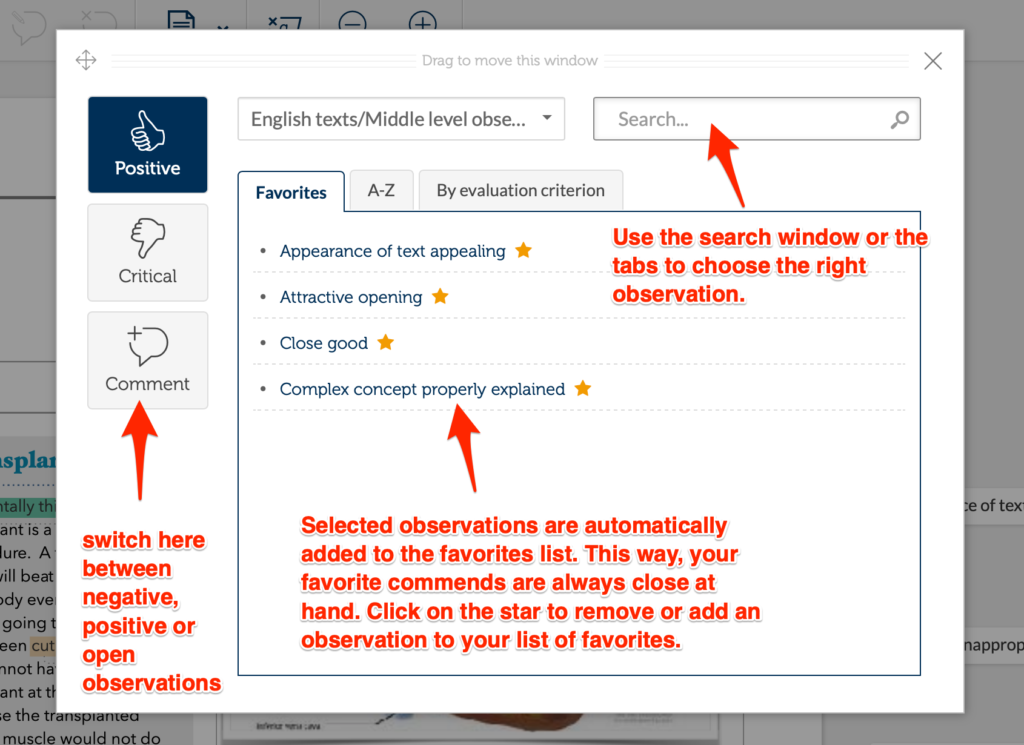
You can find the correct observation in different ways in the database. See the image below for an explanation. The Favorites list is automatically created by placing an observation in a text. You can also pre-compose the set of observations together with the department or working group and use this specific comment set when correcting an assignment.
Add open feedback
It is also possible to add your own feedback to an assignment and to save this in your personal database of Revisely. This way, you can easily add all the feedback you expect to use for your students ‘ assignments and save a lot of time. This is how it works:
First, select a part of the text in the document that you want to give feedback on Click on the icon to give open feedback. Then write your own feedback/comments. Choose the option to save the feedback as a personal observation. The field is then displayed to give the feedback a title (the text that will appear in the margin). If you don’t type anything, we’ll use the first line of the comment itself. Choose the criterion where the observation belongs to. Also choose the subcriterion in which the observation fits (optional). If you select nothing here, the new observation will be placed under the main criterion. Choose whether it is a critical or positive observation. Select whether you want to add this to your list of favorite observations or not. Click “Confirm” to add this comment to your observationset as well as to add the text you’re looking at.
Giving a grade
Once you have finished reviewing and giving feedback, you can proceed to give a grade. You can do this by clicking on Score at the top right of the screen. A selection menu will appear as shown below.
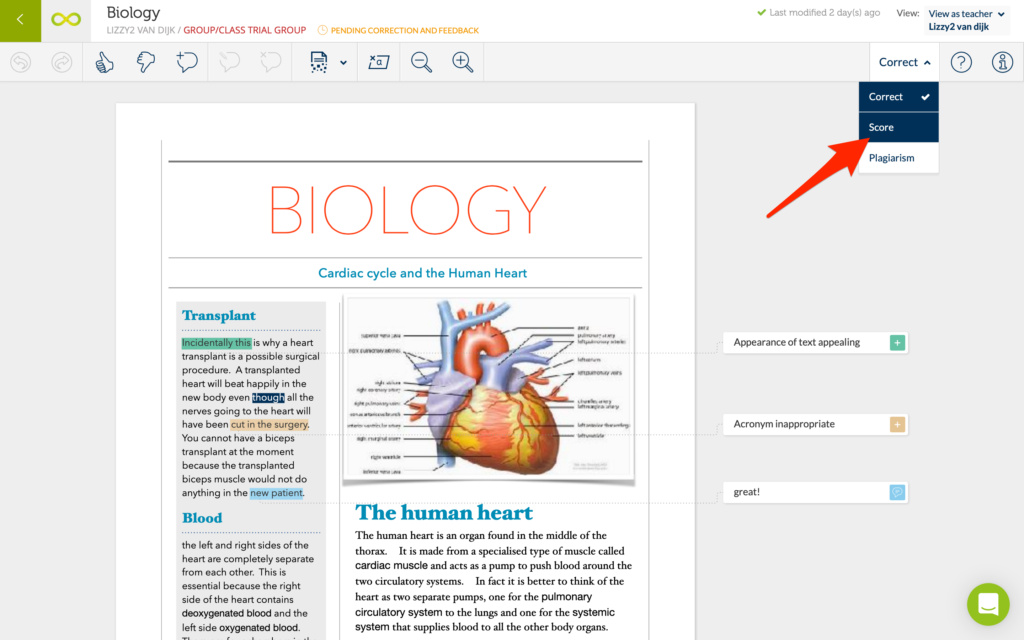
Select grade and you will enter the screen to assign grades to the different criteria of this assignment. You see the screen below with the text at the bottom.
At the top you see the different sections/categories and the observations you have made in this. Here, you give a grade per category. The system then calculates the final grade based on the weight of the category. Of course – because at Revisely the teacher always has control over the system – you can adjust this calculated grade if you think you should. You can of course also pass on partial marks and directly enter the final grade yourself.
Also make sure when correcting that your changes have been saved correctly. This is done automatically but in case the internet connection is lost, you will see a warning in the top left of the screen that the changes cannot be saved.
When you have done the grading, you can also give a general commentary on the final assessment. Then click on the big green button in order to save the assignment and to get it ready to send the feedback. The text that is provided with feedback is placed on the digital stack of checked assignments that can later be given back to the student.
Sending feedback
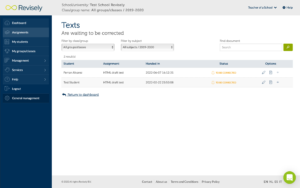
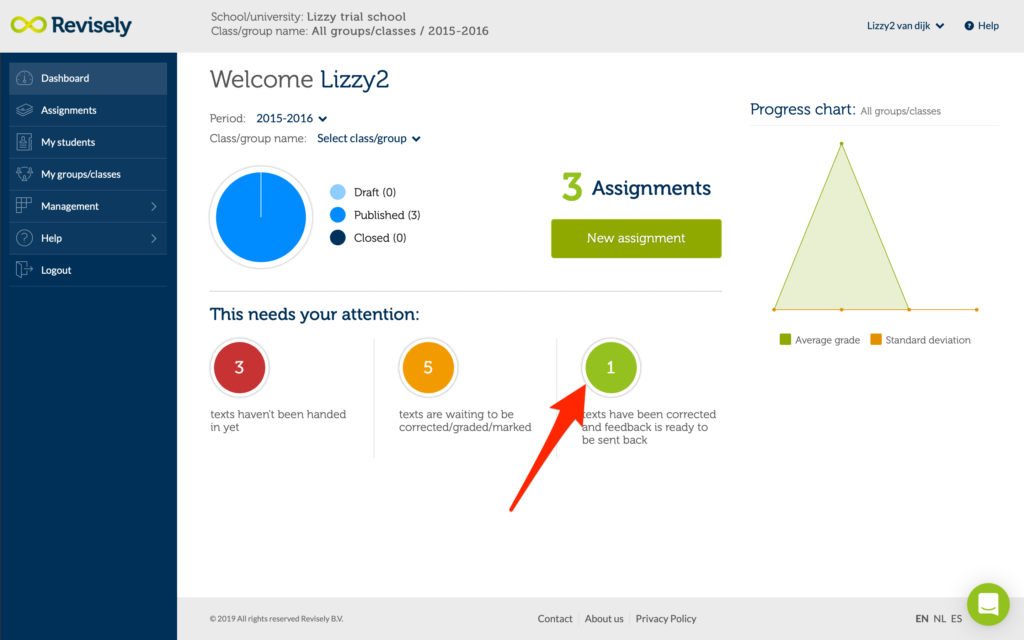
Once you have provided all the texts of your class of more insightful feedback, you can send the texts including its feedback back to your students. You can do this by clicking on the Dashboard page on the green circle as shown in the picture below.
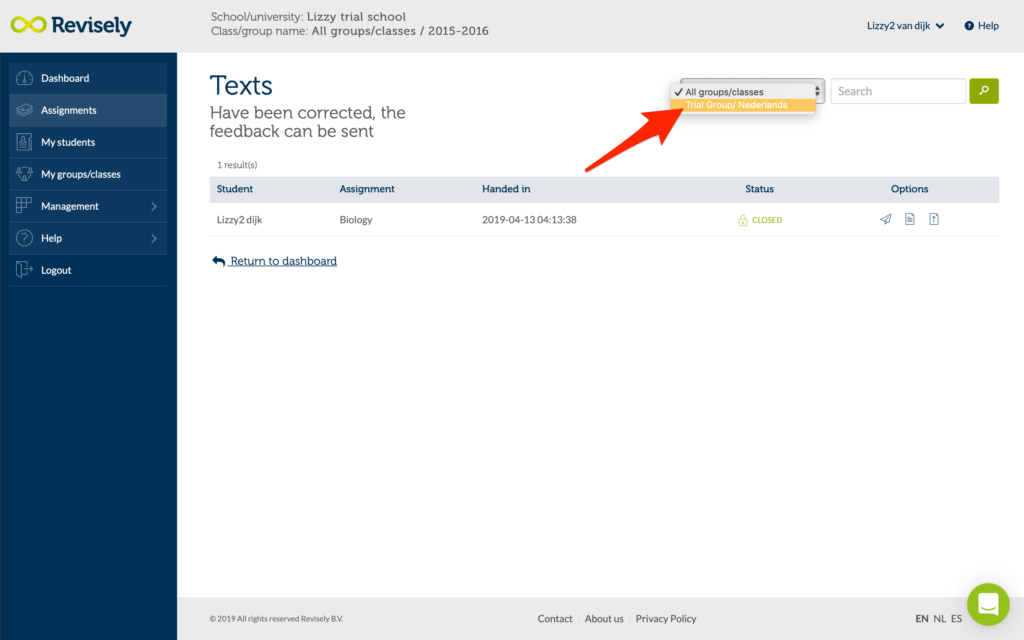
You see the list of assignments whose feedback can be sent. You can choose to send the feedback to one, multiple, or to all students in the group(s).
Advanced: an assignment with Peer grading
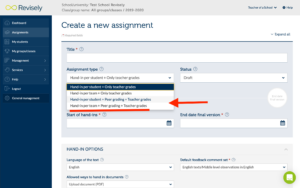
When you want your students to learn from and with each other. And learn from writing a text, and from giving feedback on other texts, you can use the Peer grading feature in Revisely. Here you create a new assignment as was described earlier. The only difference is that you select at ‘Assignment type‘ for peer grading (see image above) and that you give extra instructions for your students so they know what is expected of them when doing a Peer Grading assignment. The system automatically combines a student who corrects together with a student who hands the text in. An assignment created with the Peer grading option can be recognised by the Peer grading icon (at the Assignment page)

When you click on the assignment you can see which students are linked to each other as peers for the assignment.
Choose a title that says something about the assignment so that you can later easily find the correct assignment based on the title.
Then you make a choice in the field ‘Assignment type‘. You can choose from the standard possibility of sending out an assignment to students, a peer grading assignment, an assignment that has to be made in teams or an assignment that is both a peer grading and team assignment.
The Peer grading option ensures that the students can provide each other’s submitted texts with feedback. As a teacher you keep an overview and you may or may not include the feedback from peers in the final assessment of an assignment. The system automatically creates random student combinations that provide feedback to the work of another student.
The option of Team hand-in. Here the students are randomly put in a team of 2 or more team members. As a teacher you can also edit the teams and/or make your own team devision. Team hand-in assignment allows students to jointly submit one assignment that is afterwards also corrected, assessed and provided with feedback by the teacher.
The status of the assignment can be draft/published/closed/hidden. You can always change this later. For example, it is possible to prepare various assignments before you publish them. When you choose ‘published’ here, the assignment will be send immediately to your students once you have finished creating the assignment. Otherwise, you can send the assignment on a later time by going to ‘Assignments’ in the menu on the left and click on the icon with the three dots of the assignment in question and to click on ‘Modify Assignment’. Then you can change the status of the assignment to ‘Published’.
The start and end date and time speak for themselves.
The ‘language of the text’ determines which database of observations will be used to check and give feedback on the text. At the moment, databases with observations specifically for the Dutch, English or Spanish language are available. With English you can choose to give feedback on the level of advanced English, basic English or in Dutch. This way you can do justice to the differences between students of different levels and different school years.
Under the option ‘Way to hand in texts’ you can choose whether your students type their texts in Revisely (or copy and paste them from their word/pages file), or that they upload a document in Revisely. These can be different file formats but we recommend that your students upload it as a PDF file to ensure that the file will look the same in Revisely after uploading it.
The option ‘Accept hand-ins after the deadline‘ speaks for itself.
At general settings, you can indicate whether your students receive an extra notification by email when the assignment is published and whether they receive automatic reminders.
Plagiarism check indicates whether the plagiarism check is switched on for this assignment. This is an additional (paid) option in Revisely. Within Revisely, there is seamless integration with the plagiarism checker of Urkund, whereby submitted texts are compared with a database of websites, texts and other sources that may have been used in the assignment. When there is a part of the text that has been copied from somewhere, you can see exactly which part of an original source is used. That way you can decide for yourself what you want to do with this information.
You can select your preferences at the General options page. All options (as shown in the image above) speak for themselves.
Then, select the classes for which this assignment should apply.
You can indicate the length of the assignment at your own discretion. This is for example “2 pages”, “120-16 words” or “no more than one A4”.
At summary you can give a short description about the assignment and at the Full description more specific instruction as you wish. Both fields are visible for a student when making the assignment.
The options ‘Assignment will be graded’ and ‘Include CEFR grading’ speak for themselves.
The option ‘Use evaluation criteria‘ and ‘Show evaluation criteria to students‘ determines whether evaluation criteria are used for this assignment and whether students will be able to see which criteria are used to assess the assignment. These criteria or categories are explained below.
Under the heading ‘scores/grades/criteria‘ you will find the different criteria on which you are going to assess an assignment. Revisely has 7 standard criteria and you can add up to 5 own assessment criteria yourself. The standard criteria correspond to the categories in which the observations are classified in the database. More information about the database of observations can be found under the ‘observation database’. Here you can also choose the weighting of the chosen criteria. Just make sure the total adds up to 100%.
Finally you can add relevant documents and websites. This can be an article that students have to write their assignment about or a video or audio fragment in which arguments can be found. Any form of digital documentation is possible here.
As soon as you click on ‘save‘ and you have selected the option at ‘status’ (at the top of the page) that students will automatically receive a message as soon as the assignment has been published, the students will immediately receive a notification. If not, remember that the assignment is saved but that students are not able to start their assignments yet. If you would like to publish the assignment on a later time, go to the assignment (via ‘Assignments’ in the menu on the left) and click on the button with the three dots. Then click on ‘Modify assignment’ and change at ‘status’ the assignment to ‘published’.
The students have now received a message about the new assignment. This message will be sent by e-mail. In this e-mail message they find a link and by clicking on the link they are immediately directed to the assignment.
After publication, it is still possible to make changes to the assignment to a limited extent. It is also possible to make a copy of an assignment and give it to another class. This is possible by Modifying the assignment as is explained above.
Sent notification
Sometimes you want to inform students at a different time that they have a new assignment. Or you want to send a reminder. In that case, you can go to the list of assignments by selecting ‘Assignments‘ in the menu (left). Then click on the 3 dots on the right of the screen. This is shown in the picture with a red circle. Now choose ‘Remind all‘ to send everyone a notification of the new assignment. As soon as you click on it, the reminders will be sent immediately.
You can also choose to send a reminder to one or a coupleof students. Click on the assignment to see which students have already submitted the text and which should be remembered.
Giving of feedback – correcting texts
On the dashboard (see image below) you see that there are 14 texts that you still need to provide feedback on. Clicking on the orange button will take you to the page with the list of pending assignments.
The assignments are initially in alphabetical order of the student’s name. You can also sort by title of the assignments or by date/time of submission. Click on the marker icon to start correcting an assignment.
Once you’ve clicked on that marker icon, you’ll see the page with the document that you can start to correct.
You can also go to ‘Assignments‘ in the menu on the left to see the assignments that have to be corrected. Here you can see per assignment how many texts have been handed in and the ones that are corrected and that still have to be corrected. You can also see more details of this assignment by clicking on the different data. Also on this page it is possible to search assignments through the filters. Click on ‘..to be corrected’ of the assignment you wish to grade.
The advantage is that you can now easily select the students to whom you want to send a reminder or for whom you want to hand-in a text. As shown below in the image. By clicking on the icon with the marker you can start correcting the document that was handed-in by the student.
When you come to the review page, you see the text as it was submitted by the student. At the top of the page is a menu bar with various buttons that can be used to provide the text with feedback. See the image below for an overview.
NOTE: if the deadline has not yet expired, the student can submit a new version of the text. If a student does hand in a new assignment, the system sees this as a new text, therefore, be reviewed again and be provided with feedback.
Once you have selected a part or more parts of the text, the buttons in the menu at the top bar will become active. The different buttons are explained in the picture below.
The observation-database
Once one or more words or parts of the text are selected, it is possible to place an observation with the text. This feedback can be given in the form of compliments, critical comments or open comments.
The compliments and critical feedback form a set of 400-500 observations that are specific to the language of the text to be corrected. In the database, these observations are divided into sections or categories that you also saw when creating a new assignment. Within the section/category, you can give both positive feedback (compliments) And critical feedback (points for improvement).
All observations are shown in the margin, combining equal observations. See the image below with a number of types of observations. The compliments are indicated with the color green, the critical points with the color brown and the open observations with the color blue.
The observations on the side of the text are clearly structured and provide insight and an overview of all remarks for the teacher and for the student. It is immediately clear what strengths and points of improvement there are, where they occur and how they can be solved. There is additional theory and/or improvement points attached to the observations in the database for the student. This way the feedback becomes more transparent and also becomes more significant.
You can find the correct observation in different ways in the database. See the image below for an explanation. The Favorites list is automatically created by placing an observation in a text. You can also pre-compose the set of observations together with the department or working group and use this specific comment set when correcting an assignment.
Add open feedback
It is also possible to add your own feedback to an assignment and to save this in your personal database of Revisely. This way, you can easily add all the feedback you expect to use for your students ‘ assignments and save a lot of time. This is how it works:
First, select a part of the text in the document that you want to give feedback on Click on the icon to give open feedback. Then write your own feedback/comments. Choose the option to save the feedback as a personal observation. The field is then displayed to give the feedback a title (the text that will appear in the margin). If you don’t type anything, we’ll use the first line of the comment itself. Choose the criterion where the observation belongs to. Also choose the subcriterion in which the observation fits (optional). If you select nothing here, the new observation will be placed under the main criterion. Choose whether it is a critical or positive observation. Select whether you want to add this to your list of favorite observations or not. Click “Confirm” to add this comment to your observationset as well as to add the text you’re looking at.
Giving a grade
Once you have finished reviewing and giving feedback, you can proceed to give a grade. You can do this by clicking on Score at the top right of the screen. A selection menu will appear as shown below.
Select grade and you will enter the screen to assign grades to the different criteria of this assignment. You see the screen below with the text at the bottom.
At the top you see the different sections/categories and the observations you have made in this. Here, you give a grade per category. The system then calculates the final grade based on the weight of the category. Of course – because at Revisely the teacher always has control over the system – you can adjust this calculated grade if you think you should. You can of course also pass on partial marks and directly enter the final grade yourself.
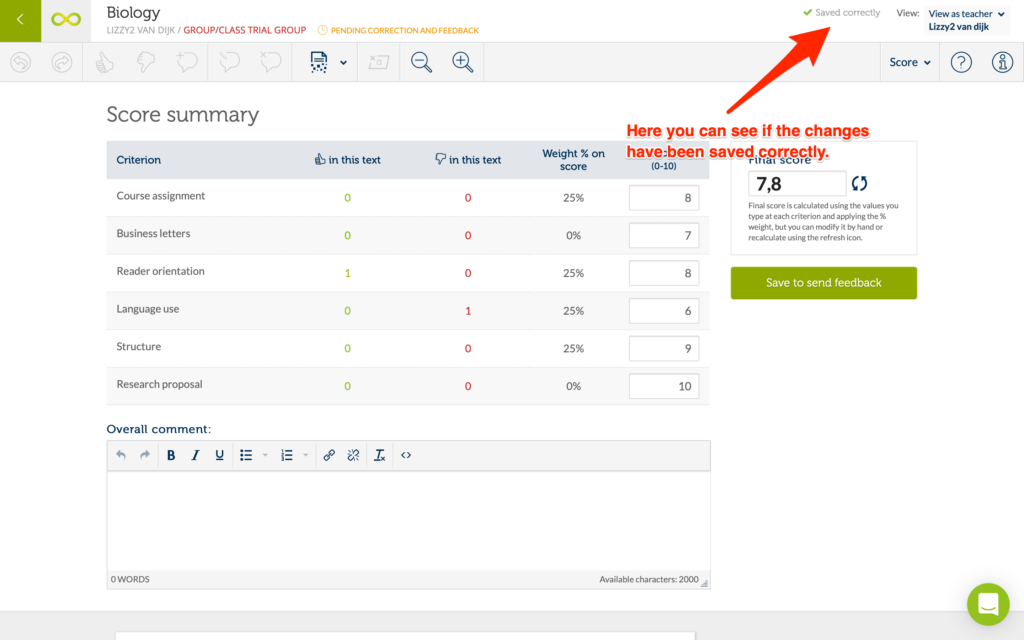
Also make sure when correcting that your changes have been saved correctly. This is done automatically but in case the internet connection is lost, you will see a warning in the top left of the screen that the changes cannot be saved.
When you have done the grading, you can also give a general commentary on the final assessment. Then click on the big green button in order to save the assignment and to get it ready to send the feedback. The text that is provided with feedback is placed on the digital stack of checked assignments that can later be given back to the student.
Sending feedback
Once you have provided all the texts of your class of more insightful feedback, you can send the texts including its feedback back to your students. You can do this by clicking on the Dashboard page on the green circle as shown in the picture below.
You see the list of assignments whose feedback can be sent. You can choose to send the feedback to one, multiple, or to all students in the group(s).
Advanced: an assignment with Peer grading
When you want your students to learn from and with each other. And learn from writing a text, and from giving feedback on other texts, you can use the Peer grading feature in Revisely. Here you create a new assignment as was described earlier. The only difference is that you select at ‘Assignment type‘ for peer grading (see image above) and that you give extra instructions for your students so they know what is expected of them when doing a Peer Grading assignment. The system automatically combines a student who corrects together with a student who hands the text in. An assignment created with the Peer grading option can be recognised by the Peer grading icon (at the Assignment page)
When you click on the assignment you can see which students are linked to each other as peers for the assignment.

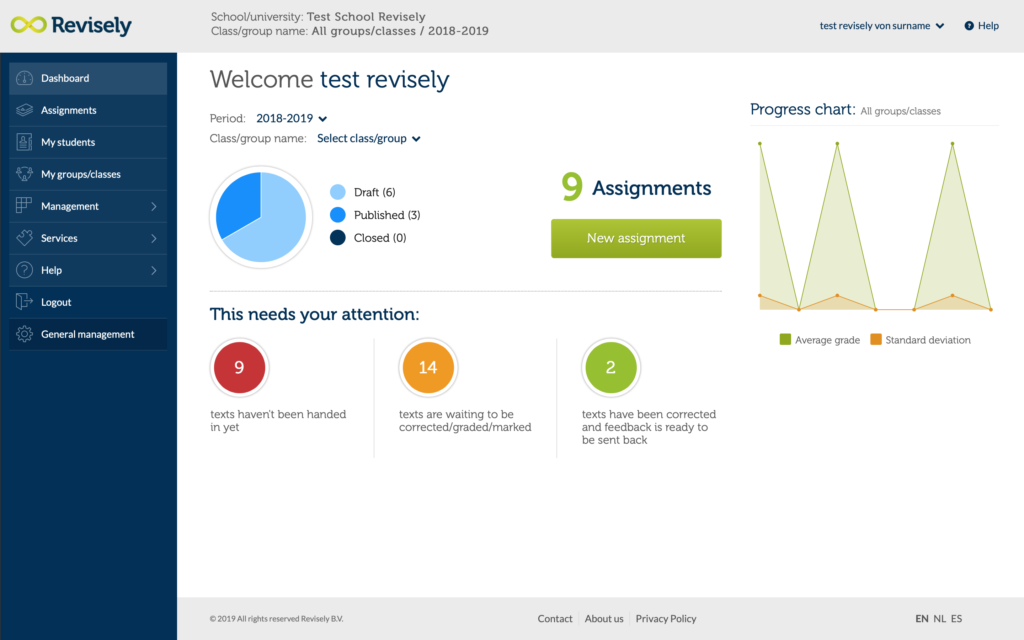
Dashboard
When you log in to Revisely as a teacher, you first arrive at the dashboard page. This page provides at a glance information about texts that still need to be returned, which still need to be corrected and the ones which are corrected already and whose feedback can be sent to the student. You can also see how many assignments are active. In addition, the page provides access to the menu on the left.
Important is to know that you can select a period and group/class here. In the picture below, the study year 2016-2017 is selected. If you also want to see information about previous years, you can change the period. The large green button ‘New assignment‘ takes you directly to the page where you create a new assignment and send it to your students.
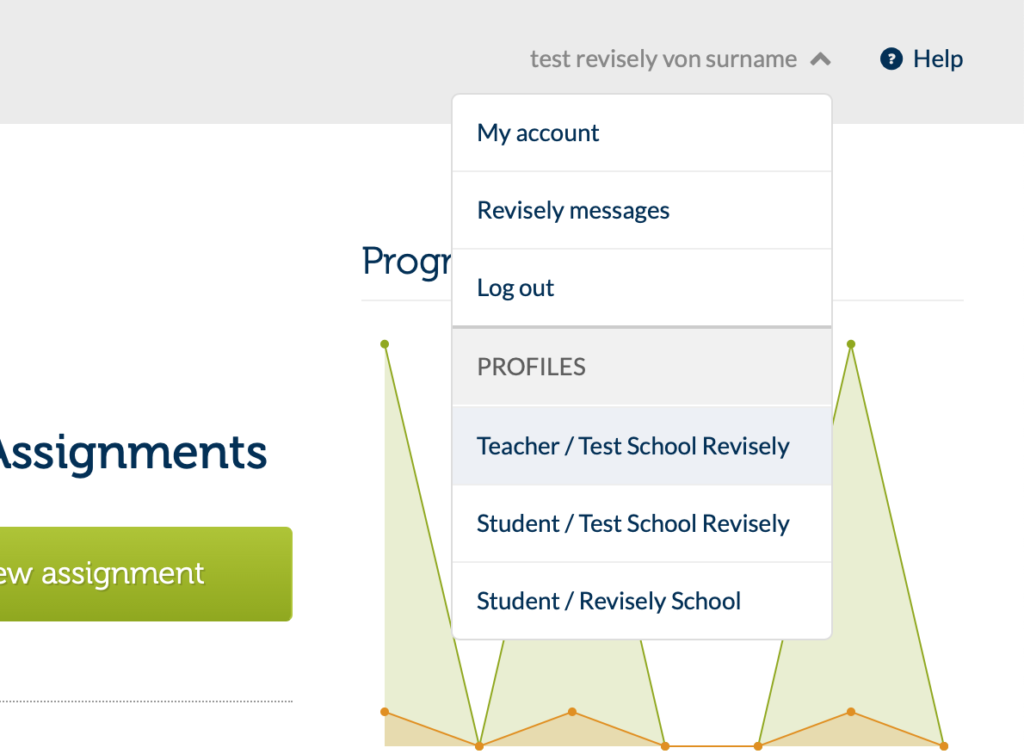
Personal account Information
You can find information about your own account at the top right of the screen. When you click on your username, it will display the following screen (as the image shown below). This allows you to view or change information about your own account. You can view all messages sent to your students. And you can switch between the role as a teacher and that of a (trial/test) student. This is convenient when trying out Revisely and to know what students will get to see in their Revisely account.
Get directly into contact with our employees
The green button at the bottom right of each page of the site brings you directly into contact with our employees. This way you can quickly ask us your question or tell your remark. We usually respond very quickly and can easily help you to get started with Revisely.
.png)

Importing students
Revisely offers all teachers the possibility to try out full functionality of the application with a demo class with demo students and demo assignments. The best experience is of course when you work with your own students and groups/classes on real assignments. You can simply import your own students in the 3 steps.
Make sure you have a CSV- or XSL-file containing the students’ data before you start. See here an example of the data and format of such a file:

Step 1:
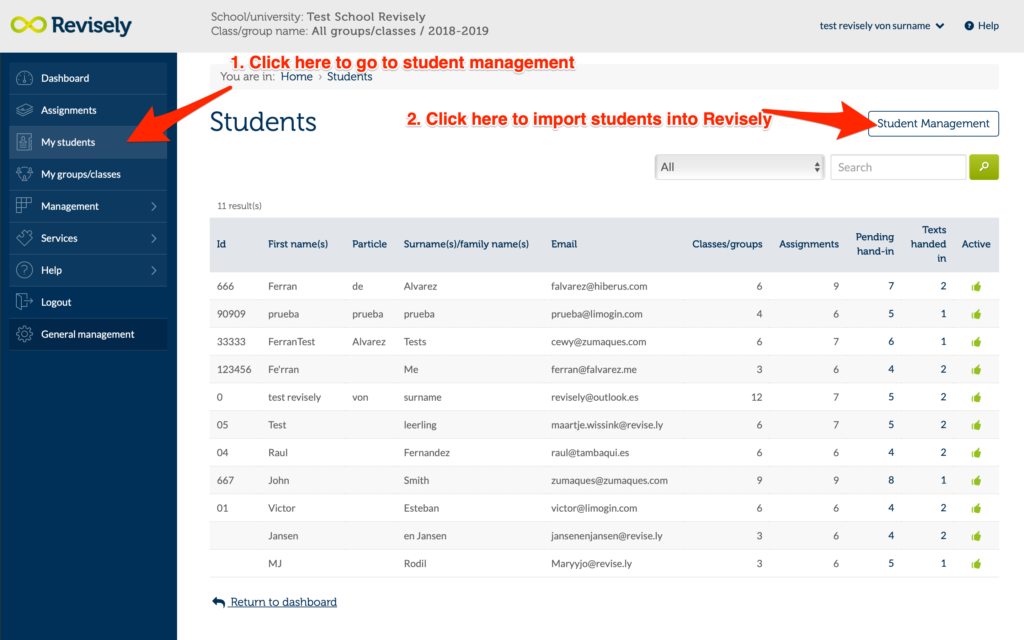
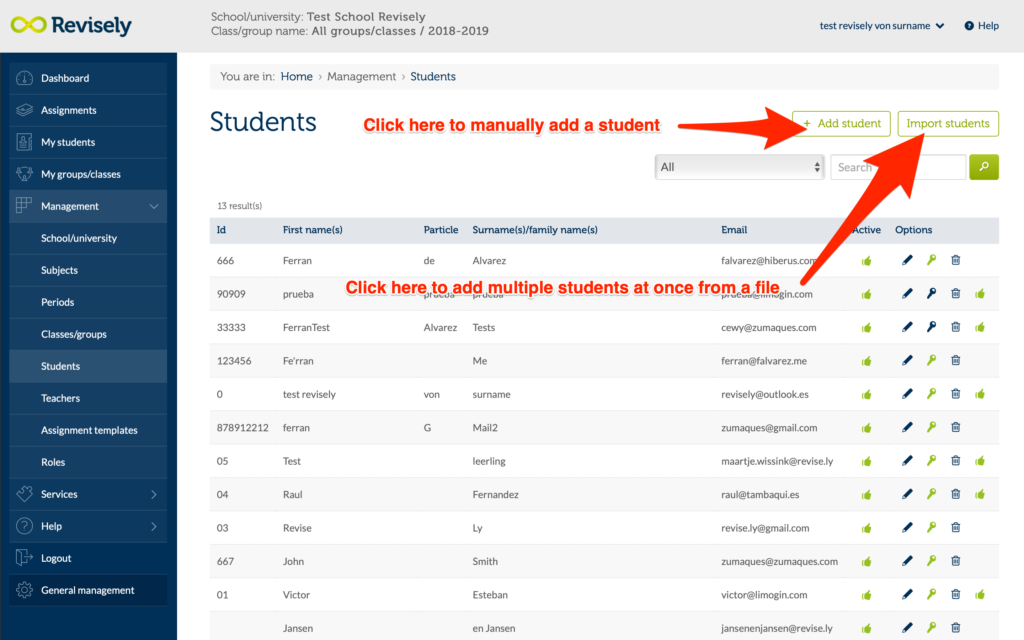
In the menu choose ‘My students‘ and click on the button ‘Student management‘ as in the image below.
Then there is the option to add one student in Revisely or to import multiple students at the same time. Choose ‘import students‘ as shown in the image below.
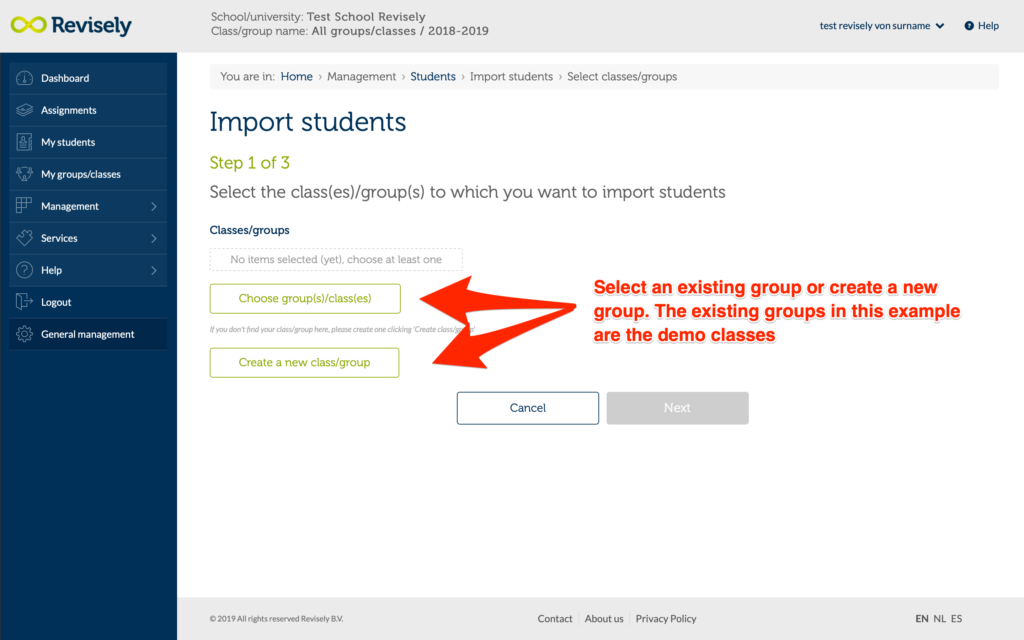
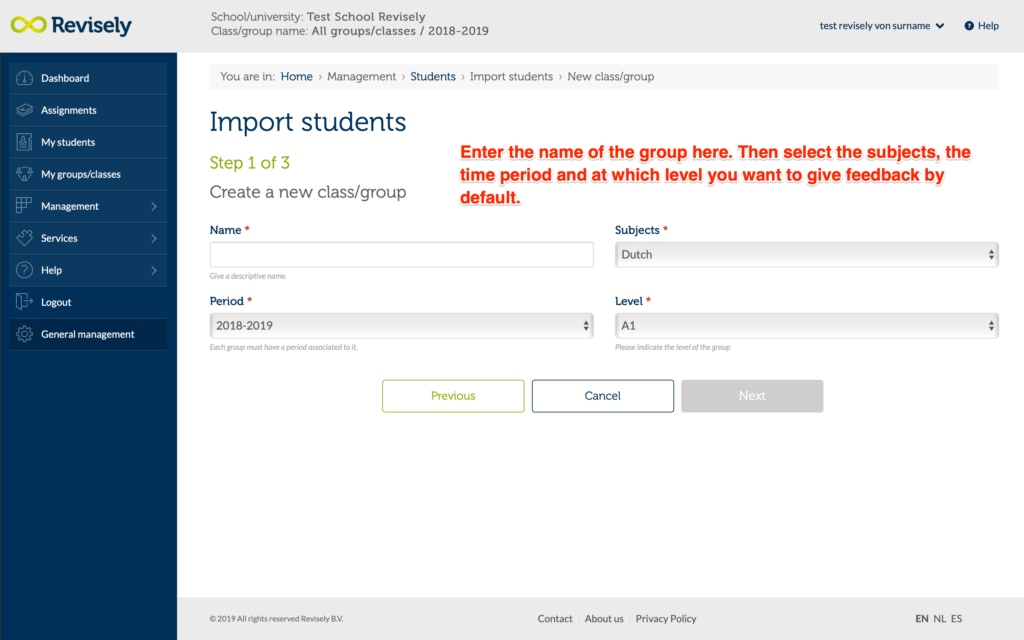
Then select the group(s) in which you want to import the students. Click on the button ‘create a new class/group‘ if the correct group/class is not yet listed. See the images below.
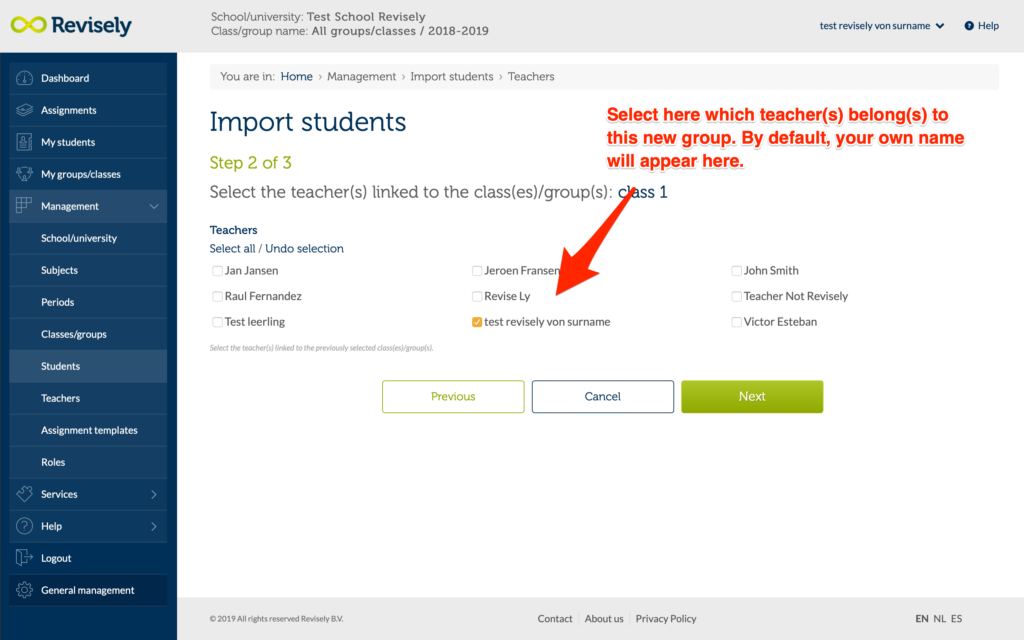
Step 2:
Select the teacher linked to the new class. By default, this is set to your own name.
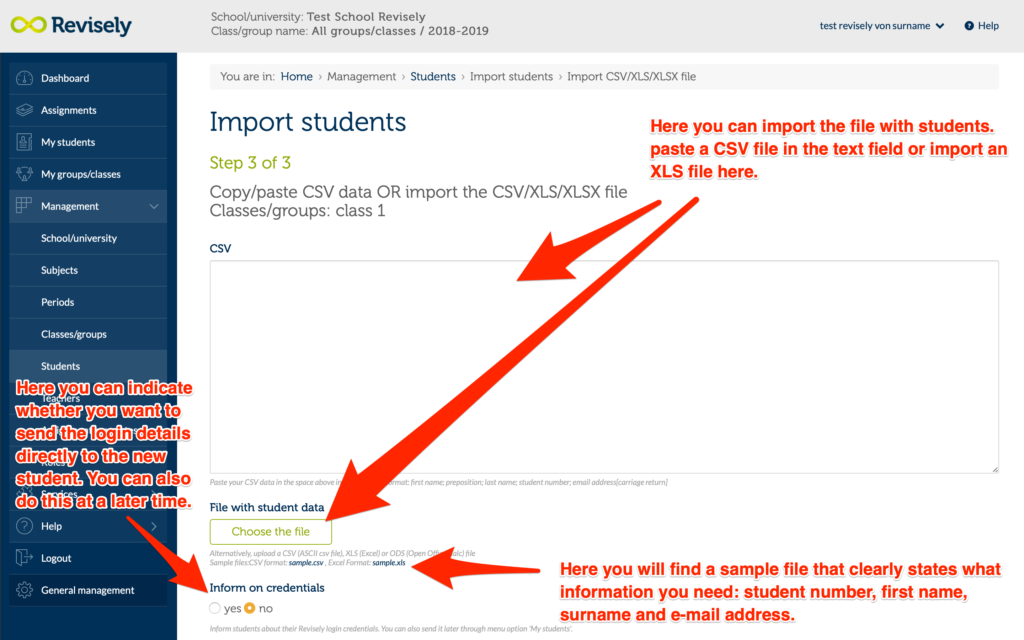
Step 3:
Paste the CSV file into the text field or open the XLS file where ‘Choose the file‘ is written. See also the image below.
Verify if the data is correctly linked in the following screen. You can change the names of the columns to match the correct information to the correct column.
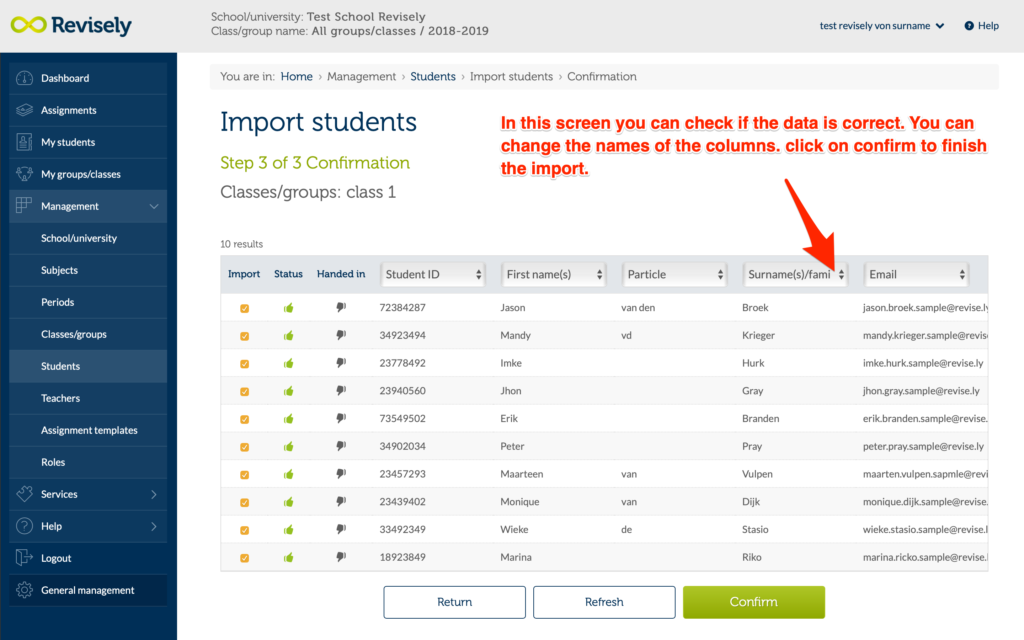
Done! Your students are now imported into a new group/classroom within Revisely. You can now find the newly created group when creating a new assignment or by selecting in the menu ‘Management’ / ‘Classes / groups‘. This way you can also change your group data again.
New assignment
If you want to give a new assignment to your students, select on the Dashboard page the big green button with ‘New assignment‘.
You will see a pop-up screen with a selection of assignment templates. Here you can choose an assignment template. This can save even more time since you can easily choose a template when you want the students to do an assignment similar to an existing template. This could be an assignment template to write an essay or about a chapter of the book you discussed. You can create these templates yourself and save them within Revisely so that you can always easily find the assignment and send it to a new group of students.
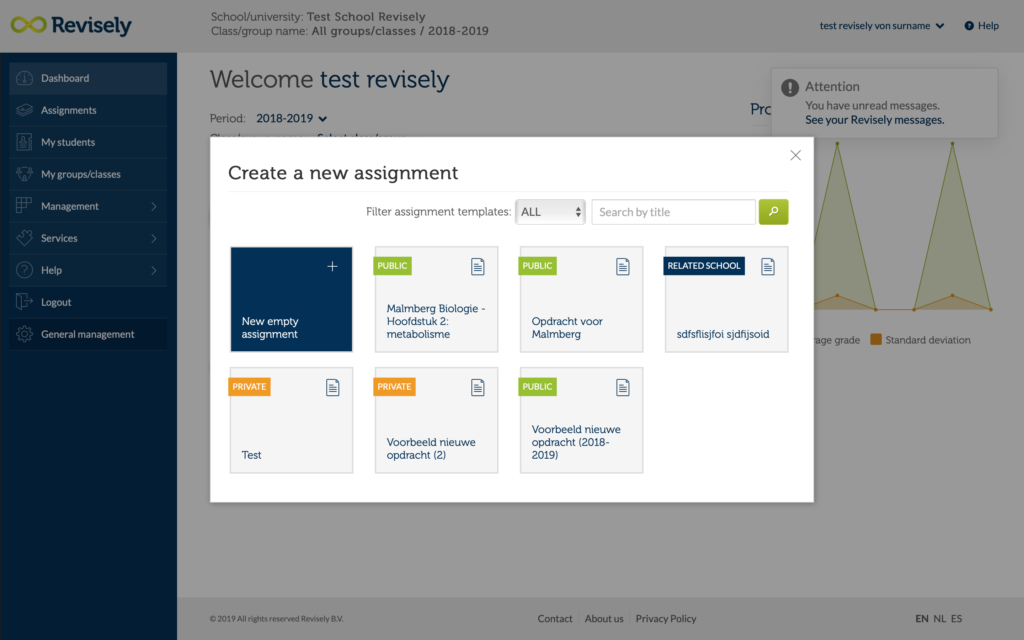
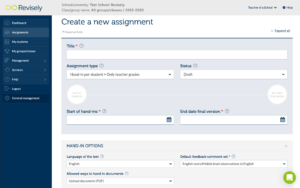
Choose ‘New Empty Assignment‘ if you want to start with an empty assignments form. You will see the screen below. Here you can fill in all the details and instructions for an assignment that your students have to make. You can type information about how to do the assignment successfully and to submit it on time. All fields with a * must be completed.
Choose a title that says something about the assignment so that you can later easily find the correct assignment based on the title.
Then you make a choice in the field ‘Assignment type‘. You can choose from the standard possibility of sending out an assignment to students, a peer grading assignment, an assignment that has to be made in teams or an assignment that is both a peer grading and team assignment.
The Peer grading option ensures that the students can provide each other’s submitted texts with feedback. As a teacher you keep an overview and you may or may not include the feedback from peers in the final assessment of an assignment. The system automatically creates random student combinations that provide feedback to the work of another student.
The option of Team hand-in. Here the students are randomly put in a team of 2 or more team members. As a teacher you can also edit the teams and/or make your own team devision. Team hand-in assignment allows students to jointly submit one assignment that is afterwards also corrected, assessed and provided with feedback by the teacher.
The status of the assignment can be draft/published/closed/hidden. You can always change this later. For example, it is possible to prepare various assignments before you publish them. When you choose ‘published’ here, the assignment will be send immediately to your students once you have finished creating the assignment. Otherwise, you can send the assignment on a later time by going to ‘Assignments’ in the menu on the left and click on the icon with the three dots of the assignment in question and to click on ‘Modify Assignment’. Then you can change the status of the assignment to ‘Published’.
The start and end date and time speak for themselves.
The ‘language of the text’ determines which database of observations will be used to check and give feedback on the text. At the moment, databases with observations specifically for the Dutch, English or Spanish language are available. With English you can choose to give feedback on the level of advanced English, basic English or in Dutch. This way you can do justice to the differences between students of different levels and different school years.
Under the option ‘Way to hand in texts’ you can choose whether your students type their texts in Revisely (or copy and paste them from their word/pages file), or that they upload a document in Revisely. These can be different file formats but we recommend that your students upload it as a PDF file to ensure that the file will look the same in Revisely after uploading it.
The option ‘Accept hand-ins after the deadline‘ speaks for itself.
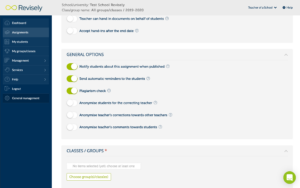
At general settings, you can indicate whether your students receive an extra notification by email when the assignment is published and whether they receive automatic reminders.
Plagiarism check indicates whether the plagiarism check is switched on for this assignment. This is an additional (paid) option in Revisely. Within Revisely, there is seamless integration with the plagiarism checker of Urkund, whereby submitted texts are compared with a database of websites, texts and other sources that may have been used in the assignment. When there is a part of the text that has been copied from somewhere, you can see exactly which part of an original source is used. That way you can decide for yourself what you want to do with this information.
You can select your preferences at the General options page. All options (as shown in the image above) speak for themselves.
Then, select the classes for which this assignment should apply.
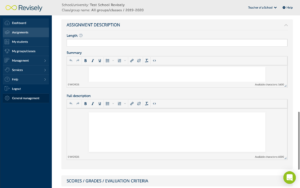
You can indicate the length of the assignment at your own discretion. This is for example “2 pages”, “120-16 words” or “no more than one A4”.
At summary you can give a short description about the assignment and at the Full description more specific instruction as you wish. Both fields are visible for a student when making the assignment.
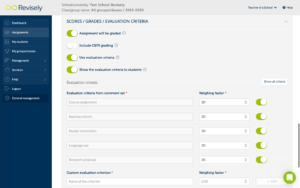
The options ‘Assignment will be graded’ and ‘Include CEFR grading’ speak for themselves.
The option ‘Use evaluation criteria‘ and ‘Show evaluation criteria to students‘ determines whether evaluation criteria are used for this assignment and whether students will be able to see which criteria are used to assess the assignment. These criteria or categories are explained below.
Under the heading ‘scores/grades/criteria‘ you will find the different criteria on which you are going to assess an assignment. Revisely has 7 standard criteria and you can add up to 5 own assessment criteria yourself. The standard criteria correspond to the categories in which the observations are classified in the database. More information about the database of observations can be found under the ‘observation database’. Here you can also choose the weighting of the chosen criteria. Just make sure the total adds up to 100%.
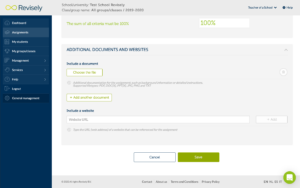
Finally you can add relevant documents and websites. This can be an article that students have to write their assignment about or a video or audio fragment in which arguments can be found. Any form of digital documentation is possible here.
As soon as you click on ‘save‘ and you have selected the option at ‘status’ (at the top of the page) that students will automatically receive a message as soon as the assignment has been published, the students will immediately receive a notification. If not, remember that the assignment is saved but that students are not able to start their assignments yet. If you would like to publish the assignment on a later time, go to the assignment (via ‘Assignments’ in the menu on the left) and click on the button with the three dots. Then click on ‘Modify assignment’ and change at ‘status’ the assignment to ‘published’.
The students have now received a message about the new assignment. This message will be sent by e-mail. In this e-mail message they find a link and by clicking on the link they are immediately directed to the assignment.
After publication, it is still possible to make changes to the assignment to a limited extent. It is also possible to make a copy of an assignment and give it to another class. This is possible by Modifying the assignment as is explained above.
Sent notification
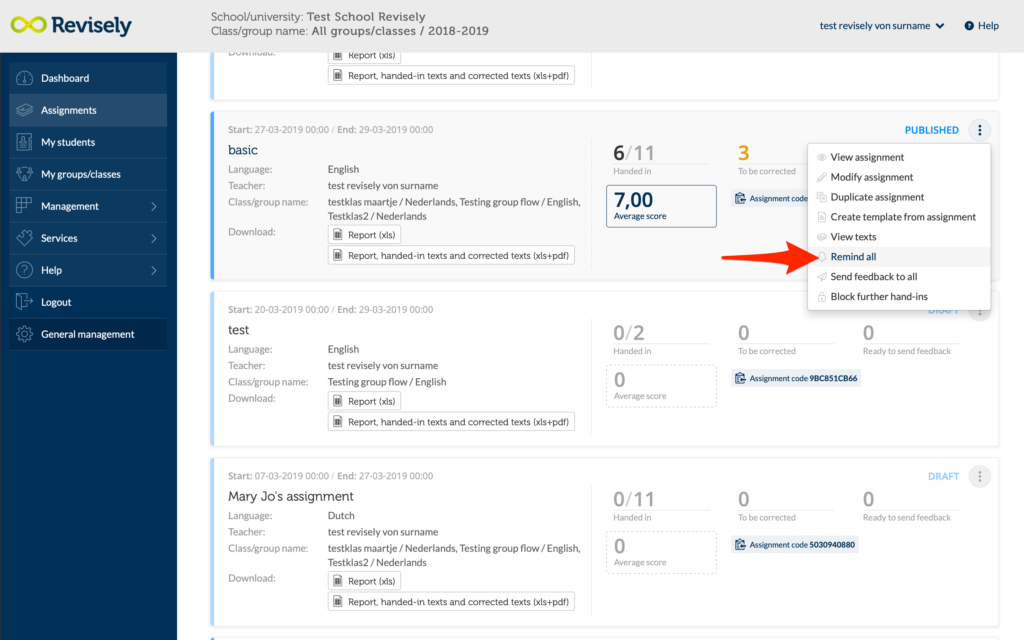
Sometimes you want to inform students at a different time that they have a new assignment. Or you want to send a reminder. In that case, you can go to the list of assignments by selecting ‘Assignments‘ in the menu (left). Then click on the 3 dots on the right of the screen. This is shown in the picture with a red circle. Now choose ‘Remind all‘ to send everyone a notification of the new assignment. As soon as you click on it, the reminders will be sent immediately.
You can also choose to send a reminder to one or a coupleof students. Click on the assignment to see which students have already submitted the text and which should be remembered.
Giving of feedback – correcting texts
On the dashboard (see image below) you see that there are 14 texts that you still need to provide feedback on. Clicking on the orange button will take you to the page with the list of pending assignments.
The assignments are initially in alphabetical order of the student’s name. You can also sort by title of the assignments or by date/time of submission. Click on the marker icon to start correcting an assignment.
Once you’ve clicked on that marker icon, you’ll see the page with the document that you can start to correct.
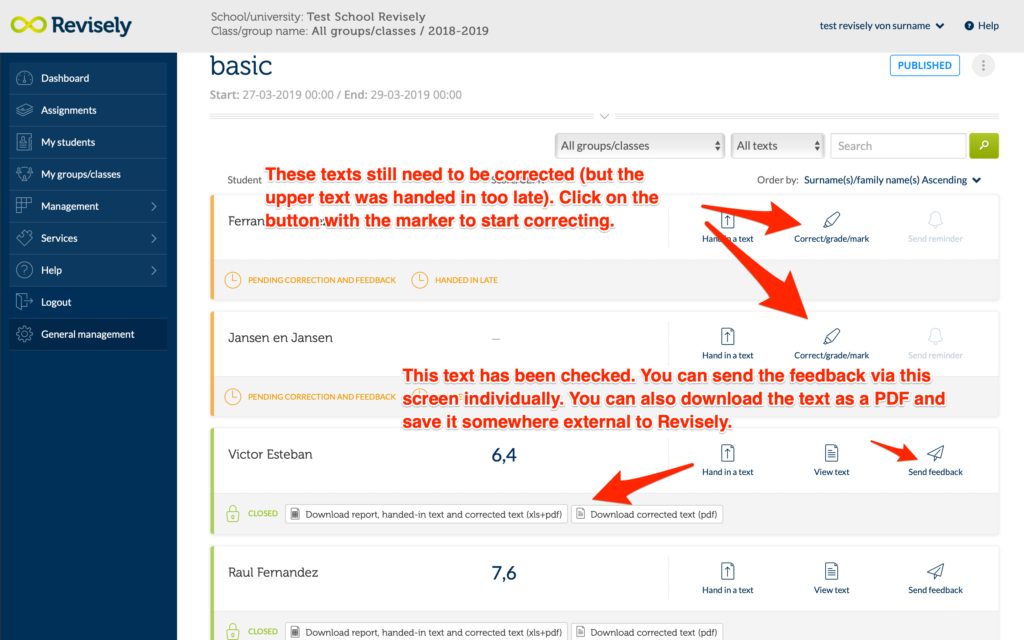
You can also go to ‘Assignments‘ in the menu on the left to see the assignments that have to be corrected. Here you can see per assignment how many texts have been handed in and the ones that are corrected and that still have to be corrected. You can also see more details of this assignment by clicking on the different data. Also on this page it is possible to search assignments through the filters. Click on ‘..to be corrected’ of the assignment you wish to grade.
The advantage is that you can now easily select the students to whom you want to send a reminder or for whom you want to hand-in a text. As shown below in the image. By clicking on the icon with the marker you can start correcting the document that was handed-in by the student.
When you come to the review page, you see the text as it was submitted by the student. At the top of the page is a menu bar with various buttons that can be used to provide the text with feedback. See the image below for an overview.
NOTE: if the deadline has not yet expired, the student can submit a new version of the text. If a student does hand in a new assignment, the system sees this as a new text, therefore, be reviewed again and be provided with feedback.
Once you have selected a part or more parts of the text, the buttons in the menu at the top bar will become active. The different buttons are explained in the picture below.
The observation-database
Once one or more words or parts of the text are selected, it is possible to place an observation with the text. This feedback can be given in the form of compliments, critical comments or open comments.
The compliments and critical feedback form a set of 400-500 observations that are specific to the language of the text to be corrected. In the database, these observations are divided into sections or categories that you also saw when creating a new assignment. Within the section/category, you can give both positive feedback (compliments) And critical feedback (points for improvement).
All observations are shown in the margin, combining equal observations. See the image below with a number of types of observations. The compliments are indicated with the color green, the critical points with the color brown and the open observations with the color blue.
The observations on the side of the text are clearly structured and provide insight and an overview of all remarks for the teacher and for the student. It is immediately clear what strengths and points of improvement there are, where they occur and how they can be solved. There is additional theory and/or improvement points attached to the observations in the database for the student. This way the feedback becomes more transparent and also becomes more significant.
You can find the correct observation in different ways in the database. See the image below for an explanation. The Favorites list is automatically created by placing an observation in a text. You can also pre-compose the set of observations together with the department or working group and use this specific comment set when correcting an assignment.
Add open feedback
It is also possible to add your own feedback to an assignment and to save this in your personal database of Revisely. This way, you can easily add all the feedback you expect to use for your students ‘ assignments and save a lot of time. This is how it works:
First, select a part of the text in the document that you want to give feedback on Click on the icon to give open feedback. Then write your own feedback/comments. Choose the option to save the feedback as a personal observation. The field is then displayed to give the feedback a title (the text that will appear in the margin). If you don’t type anything, we’ll use the first line of the comment itself. Choose the criterion where the observation belongs to. Also choose the subcriterion in which the observation fits (optional). If you select nothing here, the new observation will be placed under the main criterion. Choose whether it is a critical or positive observation. Select whether you want to add this to your list of favorite observations or not. Click “Confirm” to add this comment to your observationset as well as to add the text you’re looking at.
Giving a grade
Once you have finished reviewing and giving feedback, you can proceed to give a grade. You can do this by clicking on Score at the top right of the screen. A selection menu will appear as shown below.
Select grade and you will enter the screen to assign grades to the different criteria of this assignment. You see the screen below with the text at the bottom.
At the top you see the different sections/categories and the observations you have made in this. Here, you give a grade per category. The system then calculates the final grade based on the weight of the category. Of course – because at Revisely the teacher always has control over the system – you can adjust this calculated grade if you think you should. You can of course also pass on partial marks and directly enter the final grade yourself.
Also make sure when correcting that your changes have been saved correctly. This is done automatically but in case the internet connection is lost, you will see a warning in the top left of the screen that the changes cannot be saved.
When you have done the grading, you can also give a general commentary on the final assessment. Then click on the big green button in order to save the assignment and to get it ready to send the feedback. The text that is provided with feedback is placed on the digital stack of checked assignments that can later be given back to the student.
Sending feedback
Once you have provided all the texts of your class of more insightful feedback, you can send the texts including its feedback back to your students. You can do this by clicking on the Dashboard page on the green circle as shown in the picture below.
You see the list of assignments whose feedback can be sent. You can choose to send the feedback to one, multiple, or to all students in the group(s).
Advanced: an assignment with Peer grading
When you want your students to learn from and with each other. And learn from writing a text, and from giving feedback on other texts, you can use the Peer grading feature in Revisely. Here you create a new assignment as was described earlier. The only difference is that you select at ‘Assignment type‘ for peer grading (see image above) and that you give extra instructions for your students so they know what is expected of them when doing a Peer Grading assignment. The system automatically combines a student who corrects together with a student who hands the text in. An assignment created with the Peer grading option can be recognised by the Peer grading icon (at the Assignment page)
When you click on the assignment you can see which students are linked to each other as peers for the assignment.